一、组件库是基于vue-cli框架的的,用vue-cli创建项目
vue create hxy-ui
二、修改目录,以及重新修改配置文件。
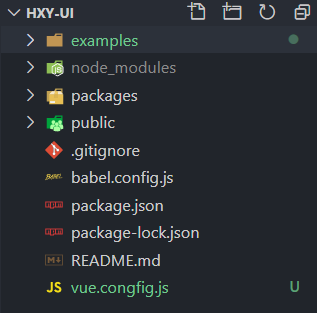
1、很多的开源组件库的源码,都喜欢用packages目录存放组件,examples目录用来展示组件。所以在这个项目内,将src目录改为examples用来展示组件。同级别创建packages目录,用来存放组件。由于改了目录,所以需要重新新配置webpack,先在最外层创建vue.congfig.js。现在的目录结构如下:
2。 删除App.vue的内容以及hellow.vue文件
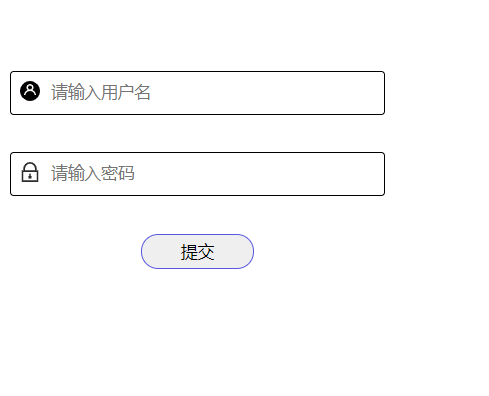
3、配置vue.config.js文件。重新运行项目成功即可。
const path = require("path");
module.exports = {
  // 修改 pages 入口
  pages: {
    index: {
      entry: "examples/main.js", // 入口
      template: "public/index.html", // 模板
      filename: "index.html", // 输出文件
    },
  },
  // 扩展 webpack 配置
  chainWebpack: (config) => {
    // @ 默认指向 src 目录,这里要改成 examples
    // 另外也可以新增一个 ~ 指向 packages
    config.resolve.alias
      .set("@", path.resolve("examples"))
      .set("~", path.resolve("packages"));
    // 把 packages 和 examples 加入编译,因为新增的文件默认是不被 webpack 处理的
    config.module
      .rule("js")
      .include.add(/packages/)
      .end()
      .include.add(/examples/)
      .end()
      .use("babel")
      .loader("babel-loader")
      .tap((options) => {
        // 修改它的选项...
        return options;
      });
  },
};
三、新建组件
1、在packages下面新建一个HxyForm组件的文件夹,同时新建一个index.js文件,用来导出所有组件。目录结构如下:
2、在HxyFrom下面新建一个src组件的文件夹,同时新建一个index.js文件,用来导出组件。目录结构如下:
3、在src目录下新建HxyForm.vue,编写组件.目录结构如下:
组件内容:
HxyForm.vue 内容
<!-- 组件说明 -->
<template>
  <div class="hxy-form" :style="hxyFormStyle">
    <p>
  <label for="form-user">
      <svg class="icon" aria-hidden="true">
    <use xlink:href="#icon-ueser_ico"></use>
</svg>
    </label>
    <input type="text" id="form-user" placeholder="请输入用户名" v-model="form.user">
    </p>

  <p>
     <label for="form-password">
      <svg class="icon" aria-hidden="true">
    <use xlink:href="#icon-password"></use>
</svg>
    </label>
    <input type="password"  id="form-password" placeholder="请输入密码"  v-model="form.password">
  </p>
  <p>
    <button type="button" @click="btn()">提交</button>
  </p>
  </div>
</template>

<script>
//import x from ''
export default {
  name: "hxyForm", // 注意这个name是必须的 后面相当于标签在使用
  components: {},
  data() {
    return {
      form:{
        user:"",
        password:""
      }
    };
  },
   props:{
     hxyFormStyle:{
       type:Object,
       default:function(){
         return {
           width:"200px",
           height:"100px",
         }
       }

     }
  },
  methods: {
    btn(){
      this.$emit("hxyFormSub",this.form)
    }
  },


};
</script>

<style lang="less" scoped>
//@import url()
*{
  box-sizing: border-box;
  margin: 0;
  padding: 0;
}

p{
  width: 100%;
  height: 35%;
  border: 1px solid black;
  margin-bottom: 10%;
 border-radius: 3px;
}

p label{
  height: 100%;
  width: 10%;
}
p input{
  height: 100%;
  width: 90%;
  border: 0;
  outline: 0;
  padding: 0 3%;
}
p input:focus {
 transform: scale(1.2);
 transition: transform 2s ease;
 border: 1px solid black;
}
p:nth-last-of-type(1) {
  border: 0;
}
p:nth-last-of-type(1) button {
  width: 30%;
  height: 80%;
  text-align: center;
  cursor: pointer;
  border-radius: 50px;
  outline: 0;
  border: 1px solid rgb(88, 88, 223);
}
</style>
index.html里引入iconfont
 <!-- iconfont 引用 -->
    <script src="//at.alicdn.com/t/font_2187906_cbncse9pzao.js"></script>
    <style>
        .icon {
       width: 1em; height: 1em;
       vertical-align: -0.15em;
       fill: currentColor;
       overflow: hidden;
    }
    </style>
4、在HxyForm/index.js中暴露组件
// 暴露组件
import hxyForm from "./src/HxyForm";
hxyForm.install = (vue) => {
  vue.component(hxyForm.name, hxyForm);
};
export default hxyForm;
5、最后在packages/index.js中导出所有组件
import HxyForm from "./HxyForm";

// 所有组件列表
const components = [HxyForm];
// 定义install方法,接收Vue作为参数
const install = function(Vue) {
  // 判断是否安装,安装过就不继续往下执行
  if (install.installed) return;
  install.installed = true;
  // 遍历注册所有组件
  components.map((component) => Vue.use(component));
};

// 检测到Vue才执行,毕竟我们是基于Vue的
if (typeof window !== "undefined" && window.Vue) {
  install(window.Vue);
}
console.log(components);
export default {
  install,
  // 所有组件,必须具有install,才能使用Vue.use()
  ...components,
};


//按需加载
export { HxyForm }
6、在项目中测试组件
在main.js中引入组件
import hxyui from '../packages'
Vue.use(hxyui);
在app.vue页面中调用
<template>
  <div id="app">
    <hxy-form :hxyFormStyle="hxyFormStyle" @hxyFormSub="hxyFormSub"></hxy-form>
  </div>
</template>

<script>
export default {
  name: "App",
  components: {},
  data() {
    return {
      hxyFormStyle: {
        width: "300px",
        height: "100px",
      },
    };
  },
  methods:{
    hxyFormSub(data){
      alert(data.user)
      alert(data.password)
    }
  }
};
</script>

<style lang="less">
#app {
  font-family: Avenir, Helvetica, Arial, sans-serif;
  -webkit-font-smoothing: antialiased;
  -moz-osx-font-smoothing: grayscale;
  text-align: center;
  color: #2c3e50;
  margin-top: 60px;
}
</style>
四、发布组件
1、在 package.json的 scripts 字段中新增一下命令:
"lib": "vue-cli-service build --target lib --name hxy-ui --dest lib packages/index.js"--target: 构建目标,默认为应用模式。这里修改为 lib 启用库模式。
--dest : 输出目录,默认 dist。这里我们改成 lib
[entry]: 最后一个参数为入口文件,默认为 src/App.vue。这里我们指定编译 packages/ 组件库目录。
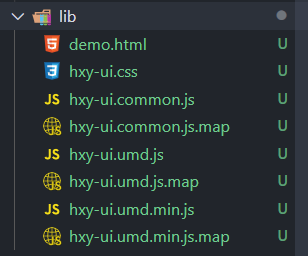
2、执行命令
npm run lib3、配置package.json文件
 "private": false, //允许上传到npm
  "main": "lib/hxy-ui.umd.min.js", //程序入口文件
package.json其他配置,配置如下
{
  "name": "hxy-ui",
  "version": "0.1.0",
  "description": "基于 vue-cli4 的组件库:hxy-ui",
  "main": "lib/hxy-ui.umd.min.js",
   "author": "hxy",
    "keywords": [
    "hxy-ui"
  ],
  "private": false,
  "scripts": {
    "serve": "vue-cli-service serve",
    "build": "vue-cli-service build",
    "lint": "vue-cli-service lint",
    "lib": "vue-cli-service build --target lib --name  hxy-ui --dest lib packages/index.js"
  },
  "dependencies": {
    "core-js": "^3.6.5",
    "vue": "^2.6.11"
  },
  "devDependencies": {
    "@vue/cli-plugin-babel": "~4.5.0",
    "@vue/cli-plugin-eslint": "~4.5.0",
    "@vue/cli-service": "~4.5.0",
    "@vue/eslint-config-prettier": "^6.0.0",
    "babel-eslint": "^10.1.0",
    "eslint": "^6.7.2",
    "eslint-plugin-prettier": "^3.1.3",
    "eslint-plugin-vue": "^6.2.2",
    "less": "^3.0.4",
    "less-loader": "^5.0.0",
    "prettier": "^1.19.1",
    "vue-template-compiler": "^2.6.11"
  },
  "eslintConfig": {
    "root": true,
    "env": {
      "node": true
    },
    "extends": [
      "plugin:vue/essential",
      "eslint:recommended",
      "@vue/prettier"
    ],
    "parserOptions": {
      "parser": "babel-eslint"
    },
    "rules": {}
  },
  "browserslist": [
    "> 1%",
    "last 2 versions",
    "not dead"
  ]
}
4、添加.npmignore 文件,发布时,只有编译后的 lib 目录、package.json、README.md才需要被发布。所以通过配置.npmignore文件忽略不需要提交的目录和文件。
# 这是复制 .gitignore 里面的
.DS_Store
node_modules
/dist

# local env files
.env.local
.env.*.local

# Log files
npm-debug.log*
yarn-debug.log*
yarn-error.log*

# Editor directories and files
.idea
.vscode
*.suo
*.ntvs*
*.njsproj
*.sln
*.sw*

# 以下是新增的
# 要忽略目录和指定文件
examples/
packages/
public/
vue.config.js
babel.config.js
*.map
*.html
5、发布到npm
1.现需要去npm官网注册账号
2.然后本地登录:npm login (使用cnpm的需要下载nrm 把源切换为npm的官方源)
3.最后发布到npm: npm publish
五、测试组件
1.另起一个项目
2.npm i -s hxy-ui
3.引入组件
全局引用ui库
在main.js中引用
import hxyui from 'hxy-ui'
import 'hxy-ui/lib/hxy-ui.css'
Vue.use(hxyui)
在app.vue中调用组件:
<template>
  <div id="app">
    <hxy-form :hxyFormStyle="hxyFormStyle" @hxyFormSub="hxyFormSub"></hxy-form>
  </div>
</template>

<script>
//  import { HxyForm } from 'hxy-ui'
//  import "hxy-ui/lib/hxy-ui.css";
export default {
  name: "App",
  components: {
    // HxyForm
  },
  data() {
    return {
      hxyFormStyle: {
        width: "500px",
        height: "100px",
      },
    };
  },
  methods:{
    hxyFormSub(data){
      alert(data.user)
      alert(data.password)
    }
  }
};
</script>

<style >
#app {
  font-family: Avenir, Helvetica, Arial, sans-serif;
  -webkit-font-smoothing: antialiased;
  -moz-osx-font-smoothing: grayscale;
  text-align: center;
  color: #2c3e50;
  margin-top: 60px;
}
</style>
局部引用 => 按需引用
在App.vue中引入并注册改组件
//局部引用 => 按需引用
 import { HxyForm } from 'hxy-ui'
 import "hxy-ui/lib/hxy-ui.css";
注册:
components: {
    HxyForm
  },
调用:
<hxy-form :hxyFormStyle="hxyFormStyle" @hxyFormSub="hxyFormSub"></hxy-form>demo:
<template>
  <div id="app">
    <hxy-form :hxyFormStyle="hxyFormStyle" @hxyFormSub="hxyFormSub"></hxy-form>
  </div>
</template>

<script>
//局部引用 => 按需引用
 import { HxyForm } from 'hxy-ui'
 import "hxy-ui/lib/hxy-ui.css";
export default {
  name: "App",
  components: {
    HxyForm
  },
  data() {
    return {
      hxyFormStyle: {
        width: "500px",
        height: "100px",
      },
    };
  },
  methods:{
    hxyFormSub(data){
      alert(data.user)
      alert(data.password)
    }
  }
};
</script>

<style >
#app {
  font-family: Avenir, Helvetica, Arial, sans-serif;
  -webkit-font-smoothing: antialiased;
  -moz-osx-font-smoothing: grayscale;
  text-align: center;
  color: #2c3e50;
  margin-top: 60px;
}
</style>
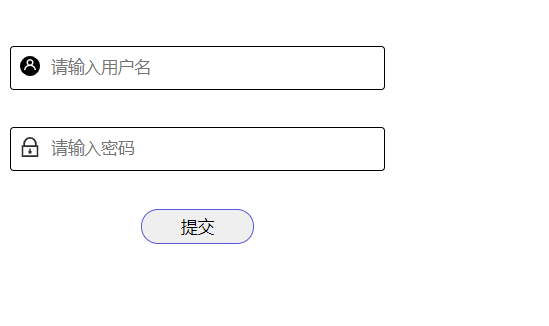
4、使用效果
版权属于:小小窝/禾下月
本文链接:https://hxyxyz.top/index.php/Web/279.html
本站文章采用 知识共享署名4.0 国际许可协议 进行许可,请在转载时注明出处及本声明!


